Making hiding spots for your cat
Everyone knows cats like to hide! Shelves, cardboard boxes, cat trees—cats who love to lounge away the afternoon will make any hiding spot work. You can easily create these cozy little spaces for them, and they’ll love you for it. Here are some ideas from Globalvet on how to make your home a cat’s paradise!
A CARDBOARD CAT HOUSE
Does your kitty climb into the empty box whenever you get a package? Why not turn the box into a space they’ll love! Depending on your artistic skills, your cardboard cat house can be as basic or sophisticated as you like!
- Reinforce the bottom of the box with tape.
- Cut the two shorter top flaps into triangles to make a roof.
- Tape the top flaps together to form the roof.
- Cut out a door and windows
- Use your imagination to decorate the house!
Here are two examples:


See the links for detailed instructions:
- https://www.cuteness.com/39176/turn-old-boxes-into-an-adorable-cat-house
- https://mybabydoo.com/2018/01/30/10205/
MAKE A TENT OUT OF AN OLD SHIRT
There are a number of different ways to turn an old shirt into a tent for your cat. If you want it to be square, you can cut a hole in a cardboard box, fit an old shirt over it, and line up the neck hole with the entrance.
See the link for detailed instructions: http://meowblog.cats.org.uk/2015/04/how-to-make-cat-tent.html

If you want to make a rounder tent, use some metal clothes hangers and scraps of cardboard.
- Cut out the base of your tent from a cardboard box. Use tape to reinforce the sides if necessary.
- Cut the wire hanger and keep the straight pieces.
- Bend the pieces of hanger into arches and position them in an X over the base so that they run diagonally from corner to corner.
- Wrap tape around the point where the pieces of hanger cross to attach them together.
- Poke a hole in each corner of the base and insert the ends of the two arches. Make sure to fold the ends of the wire arches under the cardboard base and secure them with tape so your cat doesn’t hurt themselves.
- Fit your shirt over the structure and position the neck hole across one side to make the entrance.
- Fold the sleeves and any other pieces of fabric that are sticking out under the base. Use hot glue, Velcro, or a needle and thread to fasten the shirt in place.

See the link for detailed instructions: https://www.instructables.com/id/DIY-cat-tent/
A CAT TEEPEE
You can buy cat teepees in stores, but you can also make your own! If you don’t have the tools or skills to sew one, here’s an option that might interest you:
- Draw a square on a large piece of cardboard and draw a triangle off of each side of the square.
- Cut out the shape.
- Lightly score along the lines of the square with an X-ACTO knife to make it easy to fold up the triangles.
- Cut an opening in one of the triangles to make the entrance.
- Cover the entire structure with a large piece of fabric. If you don’t have any fabric on hand, you can use old towels or clothes that you don’t wear anymore. Get creative! Remember to leave some extra fabric at the top so you can attach the triangles together.
- Tie a piece of string around the top to hold the sides in place.

See the link for detailed instructions (note that we simplified the projects so you don’t have to do any sewing):https://smiuchin.wordpress.com/2013/08/16/easy-diy-cat-tent/
This one has a more traditional look that will make your friends jealous!
- Arrange five wooden sticks that are about two and a half feet tall to form a teepee shape.
- Use string to securely tie the sticks together at the top where they meet.
- Fold your fabric in half to create a 2 ft. by 2 ft. square.
- Cut the folded fabric into a semicircle as shown here.
- Wrap the fabric around the wooden structure and secure it with a few stitches near where you attached the wooden sticks.
- Put a blanket or pillow inside.

See the link for more details: https://www.youtube.com/watch?v=NuQhDiaIppg
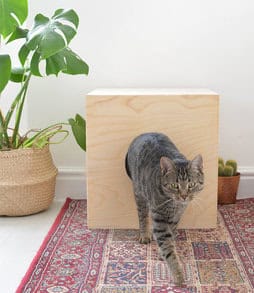
A CAT CUBE
This is a simple, fun idea! Make a cube out of wood or cardboard and add an opening so your cat can come and go as they please. You can paint it and decorate it to suit your tastes!
You can even make a cat condo by stacking a few cubes on top of one another, which will satisfy both your cat’s impulse to hide and their desire to perch somewhere high. Just make sure everything is sturdy and secure!
Here are two examples:

See the links for detailed instructions:
- https://www.burkatron.com/2016/10/diy-how-to-cat-house-bed.html
- https://foter.com/cardboard-cat-tree
Once you’ve finished your creations, make them inviting and comfortable by adding a blanket or pillow your cat loves to sleep on. Put the cat house in an area of the home you use regularly. Cats likes to be near us, even though they don’t always want to interact with us directly. Your DIY cat house is just the thing for this!
Feel free to share your DIY successes with us on Facebook and Instagram.
Happy crafting!